Read or listen to the story of Glooscap (Klu’skap) the Beavers and the Sugarloaf Mountain. https://www1.gnb.ca/0007/Culture/Heritage/VMC/sugarloaf.asp or http://website.nbm-mnb.ca/Koluskap/English/Stories/index.php
Then by using Google Earth have students find Heron Island, Miguasha, Restigouche River, Dalhousie, Bay of Chaleur and Sugarloaf Mountain. Why does Klu’skap Keluwoskap do what he does in this story? How is this story related to How Keluwoskap Created People in Lesson A?
-
Build like a beaver – For a fuller explanation of this art lesson plan see First Nation Art Plans grade 3-5 Department of Education and Early Childhood development Grade 3 Lesson 4.
The beaver was revered as a spiritual animal by Waponahkiyik (Wabanaki people). In this lesson, students will form a 3-D beaver shape out of plasticine and place it within a diorama depicting the beaver’s environment. Begin by brainstorming as a class what things might be found in a beaver’s habitat.
Preparation of materials
- Aluminum foil
- Masking tape
- Plasticine (mostly brown with some beige, white, black)
- Toothpicks
- Blue bristol board
- Drawing materials
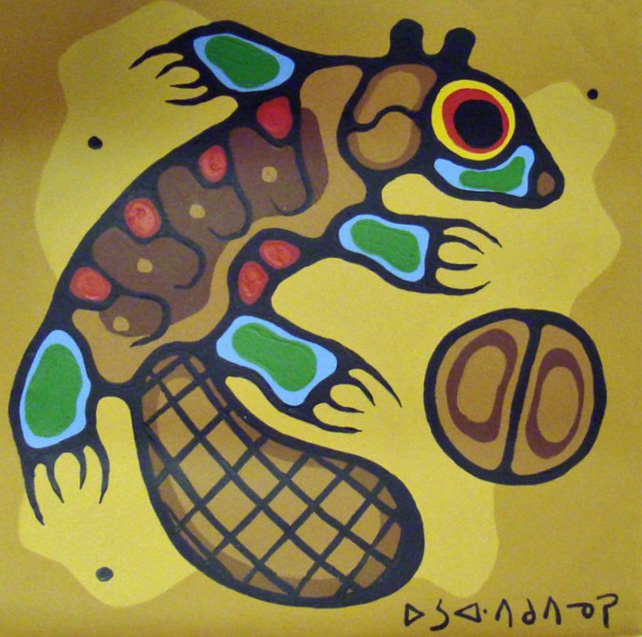
View an art image on the SMART board that demonstrates a First Nation artist’s depiction of a beaver. Here is one example by Norval Morrisseau a famous Ojibway artist.
Discuss the importance of the beaver as a spiritual animal in the story Glooscap, the Beavers and the Sugarloaf Mountain.
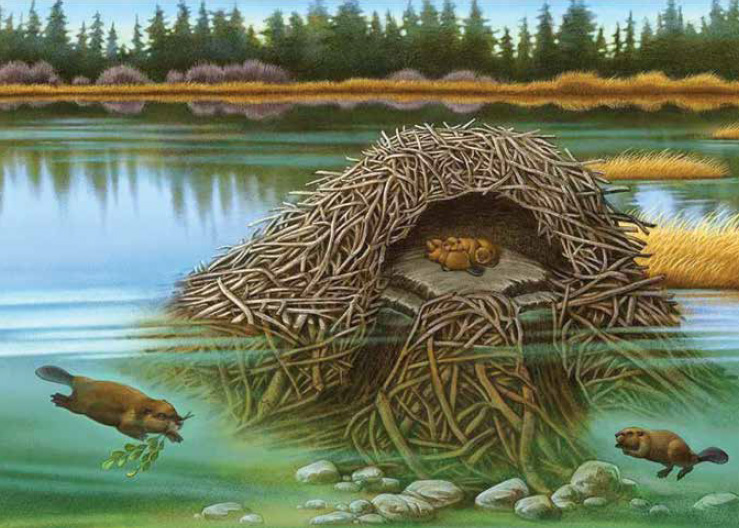
View images of a beaver and beaver dam and discuss their physical characteristics. Discuss the three-dimensional forms necessary to create a beaver and beaver dam (sphere for the head, egg shape for the body etc.).
Create
- Crumple up aluminum foil into the basic shapes of the body of a beaver.
- Use masking tape to attach the body parts together into the form of a beaver. For steps 1 & 2, keep in mind that the entire beaver should fit in the palm of the hand.
- Flatten out lots of brown plasticine.
- Take strips of plasticine and wrap around the form of the beaver as though it were his pelt.
- Take small bits of plasticine to add other details such as ears and arms.
- Use toothpicks to draw details in the surface of the plasticine such as the criss-cross pattern in the beaver’s tail.
- Use other colours of plasticine such as white and black to form small details such as the incisor teeth, eyes and nose.
- Crumple up another piece of foil into the shape of the beaver lodge. The bottom should lie flat while the top forms a dome shape. Make one large mound to represent Sugarloaf Mountain.
- Take strips of the flattened plasticine and wrap around the form of the beaver dam.
- Roll tiny pieces of beige and brown plasticine to make it look like logs and place them all over the beaver dam. For the large mound, cover it in green plasticine to represent Sugar Loaf Mountain.
- Arrange the beaver dam and the beaver on a sheet 9-inch by 12-inch blue Bristol board representing water. Cut holes in the Bristol board so that the beavers can dive underneath the water.
- Use drawing materials for other small details such as water texture, fish, eels, shells etc.
- Like Klu’skap Keluwoskap did, try tapping the beavers on the head and see if they disappear into the water.
https://www.pinterest.com/pin/508203139199338278/
Evaluation
Observe whether students took risks, problem solved and experimented with new techniques. Were they able to create an original work that visually expressed Glooscap, the Beavers and the Sugarloaf Mountain? What lesson did Mi’kmaq learn from Klu’skap Keluwoskap? (Trust and ask for help)


